Two traders enter the same BTC long. Same entry at $82,400. Same analysis. Same conviction.
Trader A sizes in at 8% of their account. No stop defined. They'll "manage it manually."
Trader B sizes in at 2% risk, stop at $80,100, position sized so that stop equals exactly 2% of capital. The trade goes against them. Trader B takes the stop. Loses 2%. Opens the next setup fresh.
Trader A watches price hit $79,800. Decides to hold. Price moves to $77,200. Now they're down 14% on their account from one trade. The math of recovery from here — needing a 16% gain just to break even — has permanently changed their next ten decisions.
Same setup. Same conviction. One of these traders is still in the game next month. The other is revenge trading on a damaged account.
Position management is not the exciting part of trading. It is the part that determines whether everything else gets a chance to work.
The Only Number That Actually Matters Per Trade
Before entry price, before target, before anything — the first number you need is: how much of my account am I willing to lose if this trade is completely wrong?
For crypto futures, where 5-10% moves happen inside a single session, the answer needs to be small. Most consistently profitable futures traders risk between 0.5% and 2% of account equity per trade. Not per day. Per trade.
This isn't conservative thinking. It's survival math.
If you risk 2% per trade and hit five consecutive losers — which any trader with a real track record has done — you're down 10%. Recoverable with a normal run of wins. If you risk 8% per trade and hit five consecutive losers, you're down 40%. You now need a 67% gain to get back to breakeven. The psychology of trading from that hole is almost impossible to maintain without further errors.
The reason most crypto futures traders blow up isn't a bad edge. It's that they take losses too large to recover from while their edge is running cold. Position sizing is the mechanism that keeps you at the table long enough for your edge to express itself.
How to Calculate Your Position Size From Your Stop
Most traders think backwards. They decide how many contracts they want to trade, then figure out where to put their stop. This is precisely wrong.
The correct sequence: define your maximum loss first, define your stop location second, then let the math tell you your position size. The stop location drives the size, not the other way around.
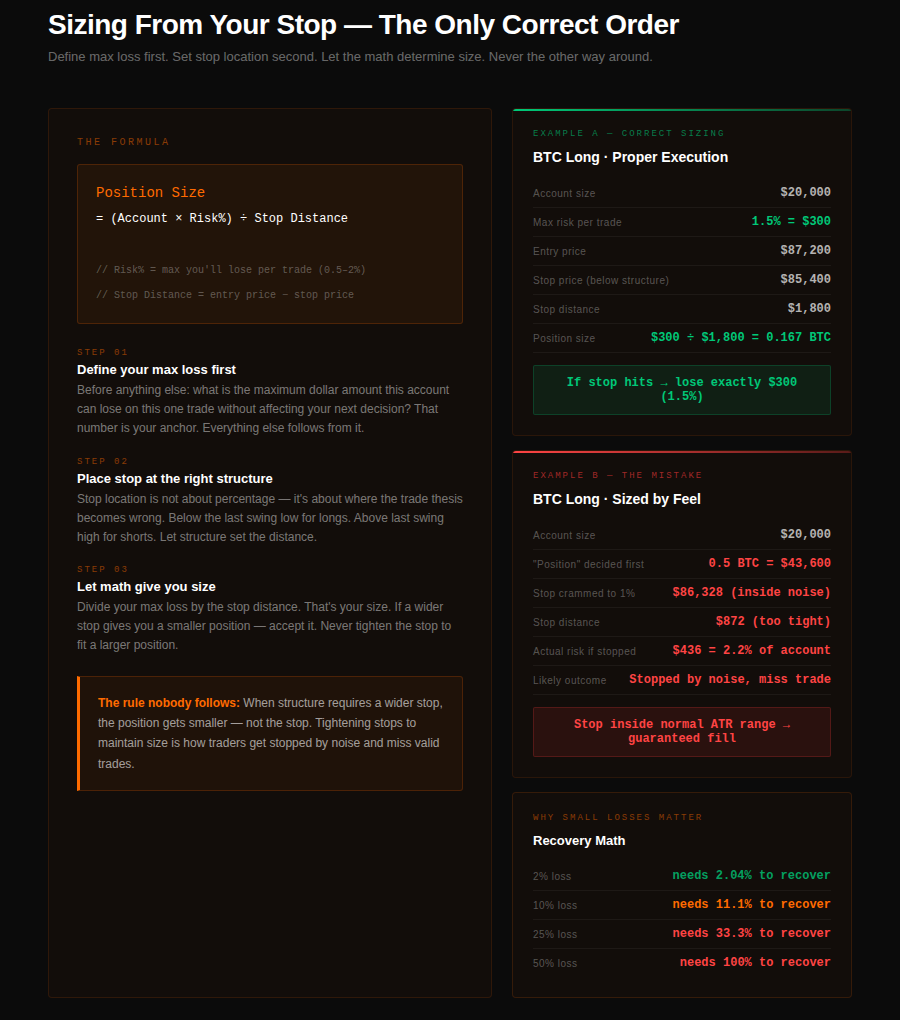
The formula is straightforward:
Position Size = (Account Size × Risk %) ÷ Distance to Stop
Concrete example. Account: $20,000. Risk per trade: 1.5%. Stop distance: $1,800 (entry at $87,200, stop at $85,400).
Position size = ($20,000 × 0.015) ÷ $1,800 = $300 ÷ $1,800 = 0.167 BTC
That's it. The math gives you the size. Not your conviction. Not how good the setup looks. Not how confident you feel.
The discipline is that when a setup has a wider stop — say the structure requires a $4,200 stop distance instead of $1,800 — the position gets smaller, not the stop. Tightening the stop to maintain position size is how traders manufacture fake precision and get stopped out by normal noise.
Stop Placement: Structure First, Then Volatility
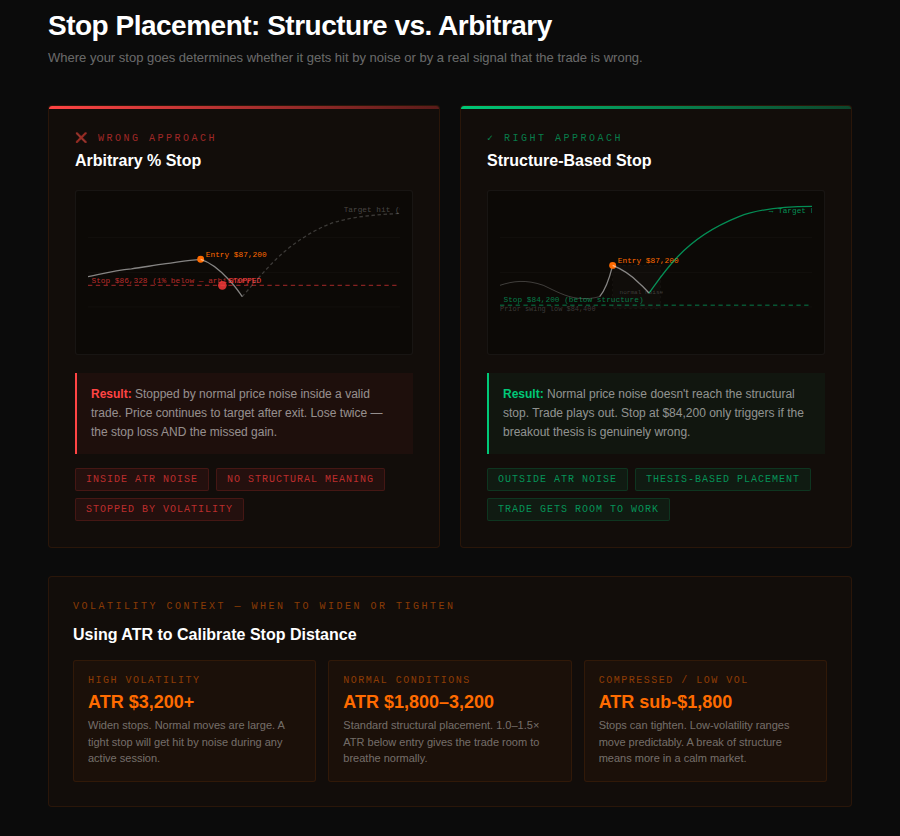
Where you put the stop matters as much as how you size the trade. A stop in the wrong place is noise in, noise out — you get stopped by normal price movement, then watch the trade go to your original target without you.
The most durable stops in crypto futures are placed just beyond meaningful structure. Not at a round number. Not at an arbitrary percentage. At the point where if price reaches that level, the original trade thesis is demonstrably wrong.
For a long entry on a breakout of range resistance at $86,800: the stop goes below the most recent swing low that formed before the break — typically the low of the accumulation that preceded the move. If that low is $84,400, the stop is $84,200. Price returning to $84,200 means the breakout failed. The trade is wrong. You exit and move on.
Volatility-based sizing adds a layer of precision. BTC's Average True Range over 14 days tells you the typical daily range. If ATR is $2,800, a stop of $800 is sitting inside one standard move — it will get hit by random noise. A stop of $2,200 to $2,800 is outside the noise. Everything that triggers it is a real signal that the trade isn't working.
The practical application: when ATR is elevated — during high-volatility sessions, major news events, funding rate extremes — stops widen. When ATR is compressed — during low-volume weekends or post-squeeze consolidations — stops can tighten. The market's volatility tells you how much room the trade needs to breathe.
Risk-Reward: Why 2:1 Is the Floor, Not the Target
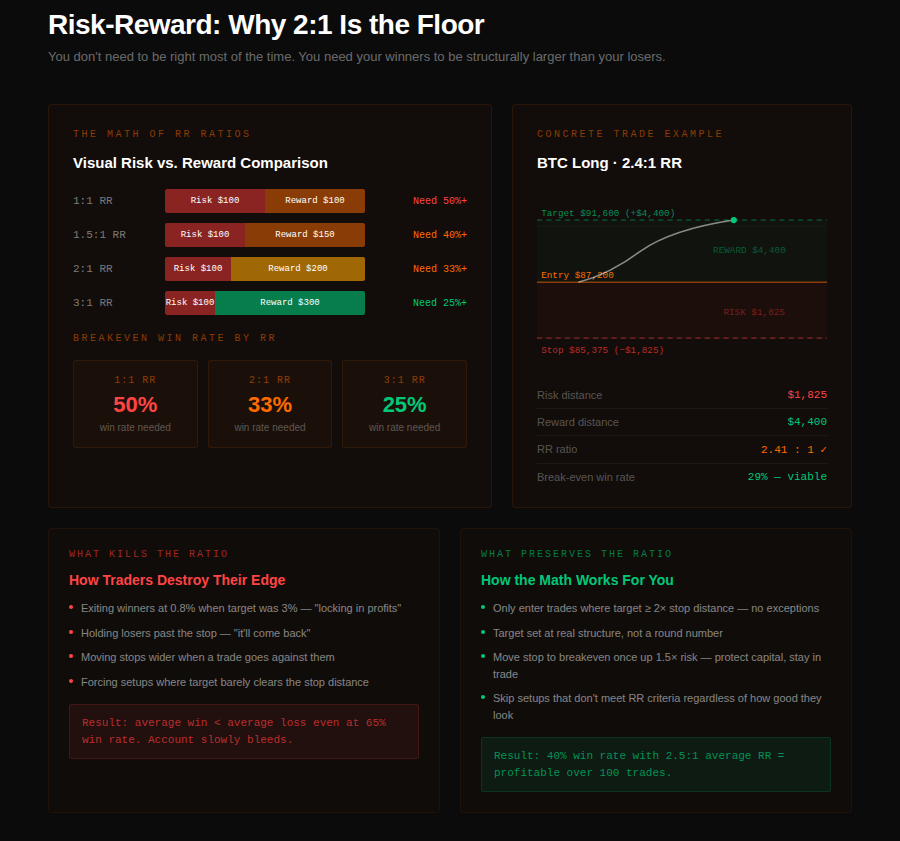
A 2:1 risk-reward ratio means: for every $1 you risk, you're targeting $2 in profit. At this ratio, you can be wrong 40% of the time and still break even before fees. Wrong half the time and you're still making money.
This is why risk-reward is the mathematical foundation of any trading edge. You don't need to be right most of the time. You need your winners to be bigger than your losers by enough to cover the losing trades.
Most retail futures traders do the opposite by accident. They cut winning trades early — taking 0.8% profits on trades that had 3% targets — while holding losing trades longer than planned. The result is an average win smaller than the average loss. Even a 60% win rate can't save that account.
Before entering any trade: identify a realistic target based on where the next meaningful resistance sits (not a round number, not wishful thinking — actual structure where supply is likely to appear). Calculate the distance. Divide by your stop distance. If the ratio is below 1.5:1, the trade doesn't meet criteria regardless of how clean the setup looks.
In liquid BTC and ETH perps, a clean setup with proper structure will typically give you 2:1 or better. If you're forcing setups where the target is barely farther than your stop, you're not trading edges — you're gambling with extra steps.
Trailing Stops: Letting the Trade Work Without Giving It All Back
Once a trade moves significantly in your favor, the question shifts from "how do I protect against loss?" to "how do I lock in gains while giving the trade room to extend?"
Trailing stops answer this. As price extends in your direction, the stop moves up with it — locking in profit at each increment while preserving upside exposure.
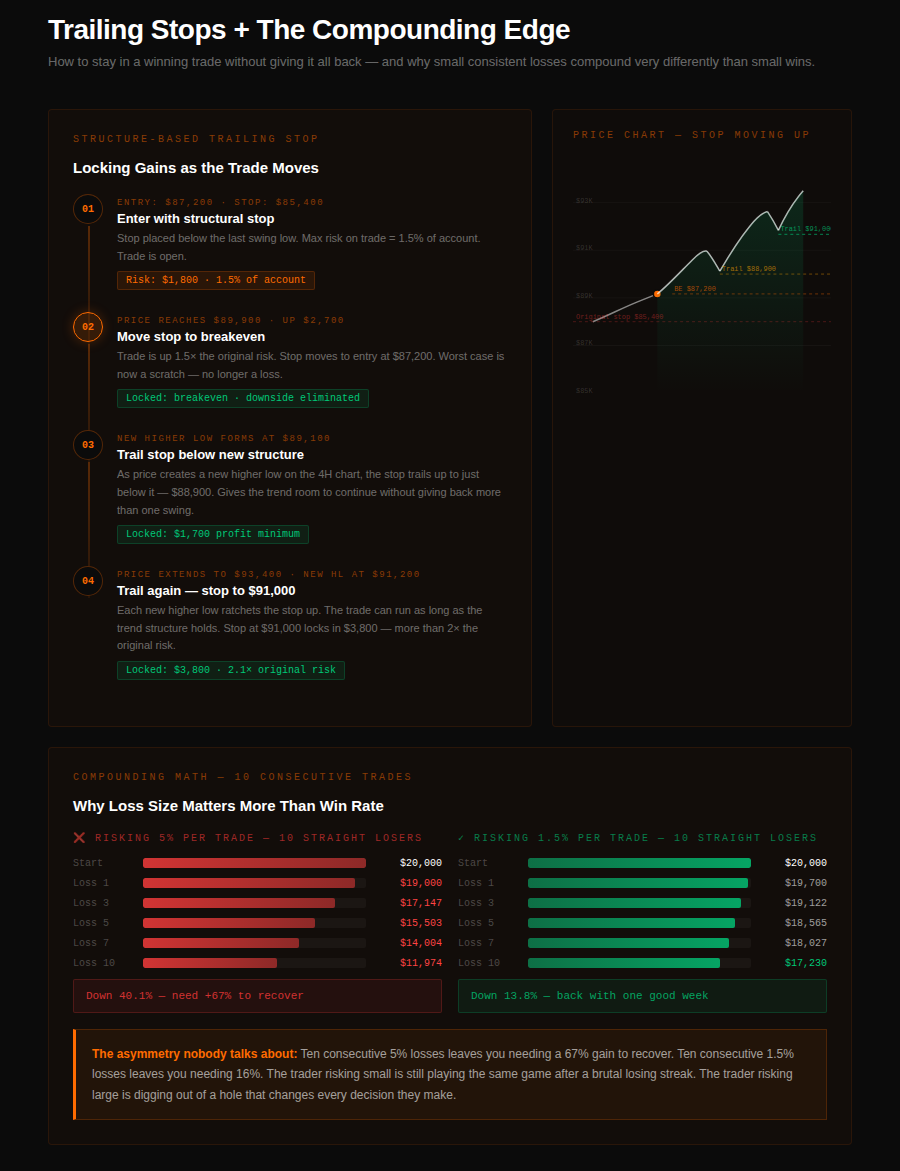
The simplest approach for crypto futures: trail the stop to just below each new swing low on the timeframe you're trading. On a 4H chart long, every time a new higher low forms, move the stop to just below it. You're never giving back more than one swing's worth of gains, and you stay in the trade as long as the structure holds.
Percentage-based trailing — stop moves to 5% or 8% below the highest price reached — is simpler to implement but less precise. It can stop you out during normal consolidations inside a strong trend. Structure-based trailing keeps you aligned with actual market behavior rather than an arbitrary distance.
One practical rule for leveraged crypto positions: once a trade is up 1.5× your risk amount, move the stop to breakeven. You've now eliminated the possibility of a winning trade turning into a loss. The worst outcome is a scratch. Everything from here is upside.
The Compound Effect Nobody Talks About
The math that most traders underestimate is the asymmetry between losses and gains. A 10% loss requires an 11% gain to recover. A 25% loss requires a 33% gain. A 50% loss requires a 100% gain. The deeper the drawdown, the harder the recovery — and the longer you spend digging out instead of compounding.
A trader risking 2% per trade who takes ten consecutive losers is down 18% after accounting for compounding. A trader risking 5% per trade in the same run is down 40%. The 2% trader recovers with a normal trading week. The 5% trader needs to double their remaining capital.
Position management isn't about trading small out of fear. It's about maintaining the mathematical conditions under which your edge can express itself consistently over hundreds of trades. The traders who survive long enough to become good aren't the ones with the best setups. They're the ones who were still at the table when their setups started working.
QuantFlows shows live order book depth, liquidation clusters, and CVD across Binance, Bybit, OKX, and Hyperliquid — giving you the structural context to place stops at levels that actually mean something. Free during beta at quantflows.xyz.